Showing posts with label trash to treasure. Show all posts

Tuesday, May 12, 2015

Booth Dinette upcycle


I recently received this sweet little treat from my man.  Some women may enjoy flowers or candy as gifts, however, I happen to appreciate pieces of furniture.  The funkier, the better! Free goodies from Craigslist just make my heart flutter!
                                                                                                                                                                                       My poor little benches were in desperate need of some love and affection.  The previous owners appear to have tried to fix these benches by adding screws, to no avail.  And when I say they added screws, I mean they ADDED screws.  There must have been 20 extra screws and accompanying holes!  Thank goodness I keep wood putty on hand, otherwise these little babies would resemble Swiss cheese.

Not only did my cute benches have extra screws and holes, the pieces did not fit together!  No wonder the previous owners added screws as these babies were never going to stay together without some serious adjustments.  Namely, a saw.  I realized, after multiple attempts at reassembly, that I would have to cut 1/4" off the back support pieces if I had any hope of putting the darlings back together.  Thankfully, I have the necessary tools to make this kind of mistake disappear.
After much fiddling, sanding and reassembling, my sweet little benches are complete.  I just LOVE the color combinations, much more so than the original light stain.  Next project, a table to go with my benches!!  


Friday, April 10, 2015

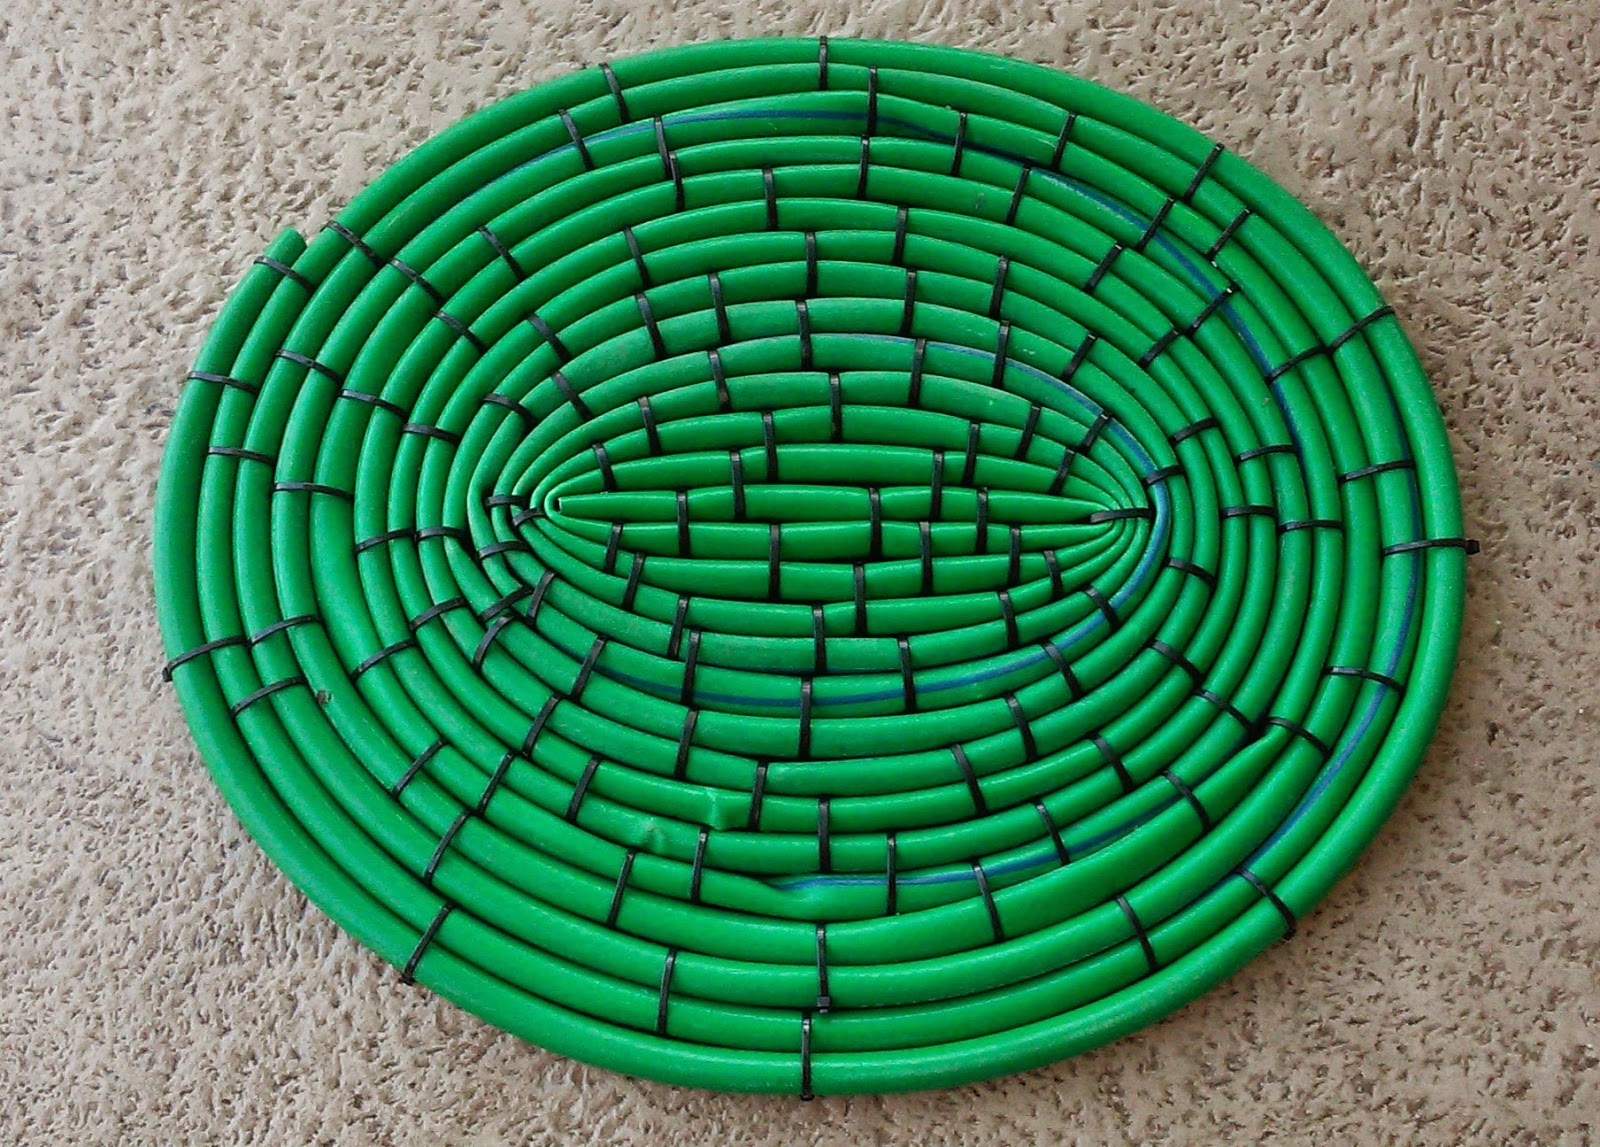
Garden hose upcycle


Spring cleaning certainly produces many creative opportunities.  Case in point, a blown garden hose.  I have been battling one of my hoses for weeks.  It has twisted and kinked so many times, it sprouted holes. Trying to use the hose for its intended purpose became impossible, but I did not want to throw it away.  However, I had no idea what to do with the thing. 

Thank goodness the Internet is available to help find solutions.  Truth be told, I felt like such a slacker once I saw all of the fabulous things people have made with old garden hoses.  However, I am in constant need of door mats and throw rugs,so I chose the path of need rather than want.

Turning the hose into an oval shaped mat was simple enough.  A little bend here, a twist there and bam, one new outdoor mat!  I admit that it took me a few minutes to realize that I did not want to pull the zip ties as tight as they would go though.  I had to cut several ties off and rework the shape once I realized how misshapen the rug became.  Lesson learned. pull the zip tie securely but not overly so.  

I am super excited to make another one of these little garden mats! There is one more old hose sitting in my backyard as I write, just waiting to be repurposed.  I believe the next mat will be made with colored zip ties.  A rainbow in the round, so to speak.

Thursday, February 12, 2015

Let There Be Light

I can get a little goofy when it comes time for SERIOUS cleaning.  There is the everyday type of cleaning which I do not get too worked up about.  You know what I mean when I say everyday cleaning, I am sure.  Just the basics; make beds, sweep floors, do laundry and dishes, etc.  Then there is the SERIOUS cleaning.  The type of cleaning which is performed prior to house guests arriving. Well, I am in the SERIOUS cleaning mode in preparation for my parents arrival next week.  Dusting ceiling fans, cleaning lamp shades, washing baseboards, etc.

I was busily cleaning and dusting yesterday; humming a happy little tune to myself, when I began working on the lamp shades.  A simple enough activity, one would think.   Remove shades, cart out to the garage and blast with an air compressor.  This works wonders for getting dust out of the strange fabric which seems to cover all of my shades.  It is probably perfectly normal fabric but affixed in such a way that I cannot throw it in the washing machine (my preferred method for cleaning).  While blasting the shades, I noticed the two from my bedroom were showing serious signs of age.  Perfectly normal considering I have had these lamps for at least a decade.  However, normal looking or not, I did not like the aged look.  Neither am I  one to run out and buy a replacement unless I absolutely must.  So I grabbed a can of spray paint and had a little fun.


The shade on the right is what each of these looked like prior to my painting frenzy - yuck.  The left sports a fresh coat of spray paint and a new lease on life.  In just minutes, I was able to transform something old into something not so old, also known as new (to me).

Granted, the odds of anyone commenting on the interior appearance of my lamp shades are slim.  However, it makes me feel better as a hostess to have things as neat and fresh looking as possible.  It is just a thing with me.  Obviously, I have been a homemaker for far too many years and need to get out more.  ;)  But that's a story for another day.


Thursday, December 4, 2014

Frugal Holiday Greenery


Rocks and dirt;  that's just what I want in the house!  Okay, I admit, I exaggerated a little bit.  I am not fond of having rocks and dirt in the house, but I do like having flowers and plants.  Even if one of my cats does like to eat them!  That would be my Garfield wannabe cat.  He LOVES to eat flowers and greens.

Since I know any flowers or greens will not last long, I hesitate to spend money on those types of pretty things.  Not only does my cat eat them, he makes a huge mess while doing so.  The stinker.

This year, I decided to add a little holiday greenery that won't irritate me when the cat destroys it. That means it has to be free.  And small, to minimize the clean-up process.  My little cutie pie greenery "bouquet" fits the bill.

I grabbed an old salsa jar (we go through a lot of salsa), some rocks and dirt from the yard, and left over winter grass seeds.

First, I filled the jar about half full with rocks.  Next, I put the dirt and grass seeds in an old pantyhose leg and tied it off.  This, I hope, will minimize the clean-up process when the kitty goes to town.  I finally added some water and waited a few days for the seeds to sprout.  Once the seeds sprouted, I added a little ribbon and a paper towel tube ornament to add a little sparkle.

When all was said and done, I think I ended up with a cute little holiday greenery "vase".  A sweet little whatnot that adds a little cheer.  

Tuesday, November 25, 2014

Greeting card and broken mirror upcycle


I do not like throwing things away, as is obvious from the projects I do.  Not only do I dislike throwing useful items away, I am appalled by the waste I see around me.  It just irritates me!

However, I do enjoy re-purposing items that may otherwise end up at the landfill.  For example, I happened to have a metal frame which, in a prior life, contained four mirrors.  Several of the mirrors broke once the frame hit the floor, but I really liked the neat little pattern of the frame.  There is something nifty about an intricate metal frame, in my opinion.

Since the dreaded broken mirror incident, I have been trying to determine what I could do with the cool metal frame.  It has taken some time but inspiration finally struck!  Rather than using the frame in a traditional sense, I decided to create a little motivational reminder.  What better way to remind myself to always have hope than to put it up on the wall?!  After all, it is difficult to ignore something that is right in your face.

As I love combining the colors pink and black, I searched through my used greeting card stockpile and found cards with a pretty combination of pinks and oranges.  I then fired up the printer, found a font I liked, and printed the word "hope".  Next, I taped the letters to the cards and cut them out.  Last but not least, I used my go-to product of choice - Mod Podge - and affixed the card stock letters to the former mirror backing pieces.  Easy-peasy!

I now have no excuse to ever lose hope as I have a sweet little reminder hanging on the wall.

Monday, November 24, 2014

Paper towel tube flowers


Super easy, quick and cute; a fun project for any age or occasion.  These little jewel-centered flowers are made from paper towel tubes, spray paint and plastic gems.   A hot glue gun is also helpful.

Simply flatten the cardboard tubes and cut off 1/4" slices.  Fold each of the strips in half and apply hot glue to the outside of the fold.  (Which will be the center of the flower)  Add as many of the folded strips as you like as you continue applying hot glue to the fold (center).


I happened to have some orange spray paint and decided to give that a try.  I admit, getting spray paint into all of the nooks and crannies was not the simplest procedure.  But I like the way it looked once painted. All that was left was to fire up the old glue gun again and attach some gems.


I think these flowers add a festive look when sprinkled across a tabletop. They add a sweet little pop of color and whimsy.

Sunday, November 23, 2014

Oh boy, flowers!! And the need for a small vase.


Oh boy, I love fresh flowers!  And so does one of my cats.  The little darling has broken my flower vases by snacking on the stems and knocking the vase to the ground.  Glass does not respond favorably to a three foot drop to a hard surface.  

Be that as it may, I received a surprise bouquet of flowers yesterday - woot-woot!  Which meant I needed a small vase or container of some sort to display my pretties.  Of course,  I did not have one handy, thanks to my pudgy cat!

The first thing I grabbed was an old spaghetti sauce jar primarily because it was close at hand.  After trimming the flowers and placing them in my new "vase" they looked . . . less than wonderful.  

I decided to add a little pizazz by wrapping the jar with scrap fabric and securing it with a bit of coordinating yarn.  Finally, I sprinkled some paper towel tube flowers around the base of the "vase".  I have to say, I think it turned into a cute little display.

Now, if I can just figure out how to keep my Garfield sized cat from snacking on my flowers.

Saturday, November 22, 2014

Dinette chair cover


Several months ago, I found four dinette chairs (with wheels) at a local thrift store.  I did not particularly care for the fabric but, for $25 for the set, I couldn't turn them down.  Since finding these babies, we have put them to use and have found they are quite handy to have.  With one exception . . . our cats.  The cats LOVE napping on the chairs!  Ordinarily, I don't mind our four legged darlings snoozing the day away.  That is, until I realized how much fur they left behind on the chairs.  Not only is the hair a nuisance to clean, we have friends who are allergic to cats.  The fur was making it difficult to include our allergy riddled friends over for a visit.  It was time to resolve this little issue in our home.

Originally, I tried making slip covers from an old sheet we had tucked away in the linen closet.  I thought slip covers would solve the  fur problem by allowing me to wash everything prior to our cat allergy pal's next visit.  That worked for about a day until the fur babies decided to play chase and ripped holes in the thin sheet material.  It was obvious that I needed to use a heavier weighted fabric if I had any hope of success with my new plan.

Thankfully, I was given a car load of fabric from a local homeschool mom several months ago.  Included in this bonanza were yards and yards are heavy weight cottons.  The patterns are probably not ones I would have chosen, had I gone to the fabric store and paid good money.  However, free fabric is pretty to me, regardless of the pattern.  That's just how I roll.

As I am not an expert seamstress by any stretch of the imagination, I had to keep the design really simple. And a simple design, in my opinion, involved measuring the length of fabric I would need to cover the back, front and seat of the chair.  I then added a few more inches to create an overhanging skirt.

Next came the oh-so-wonderful serger which is on loan to me from my Mom.  I am now in love with a serger!  This fabulous invention cuts and sews all in one fell swoop. I love, love, love it!

The final step needed to complete my new slip covers was to add a little skirt to each side of the seat portion.  Honestly, I didn't even measure the sides but rather "eyeballed" the length needed and used the serger to complete the corners then cut and trim around the entire bottom hem.

I am tickled with the results and now have washable dining chair slip covers.  Now it is time to host another dinner party since I can easily remove all cat fur from chairs. This little project won't win any design awards but suits my needs for the time being.  Free and functional - my favorite combination!


Friday, November 21, 2014

Paper towel tube gift boxes


What can you do with paper towel tubes, used dryer sheets and spray paint?  You can convert them into little gift boxes.  

I thought it would be fun to have a little gift for each person seated around the Thanksgiving table this year.  Nothing fancy or elaborate; just a little something that shows each person I was thinking about them.  Granted, the meal I cook should show them my devotion, but I wanted a little something extra.

These were simple to make which is of course my type of project.  I investigated my supply area and pulled a few things out.  The paper towel tubes were the beginning of my quest.  Next came a few used dryer sheets (and yes, I keep those things) followed by a few old greeting cards with cool little leaves.  Last, but far from least -Mod Podge.

I began by cutting each tube in half lengthwise and folding in the ends.  I then wrapped each one with a dryer sheet.  A little Mod Podge and some drying time and I was ready to paint.  

Originally, I tried using some off white colored acrylic paints but did not care for the look.    Instead, I chose a chocolate brown spray paint I picked up at our local landfill.  (From the free paint shed, woot-woot!)  The final step was to affix the greeting cad leaves and add a little glitter.  Not much glitter, mind you, just enough for a tiny sparkle.

As for what to put inside; I haven't decided.  Maybe a lottery ticket or candy.  Perhaps a note that expresses why I am thankful these people are in my life.  Shucks!  I could go "all out" and put all of that in each gift box.  Regardless of the contents, I am thankful for the opportunity to share this holiday with my family.  Life is good!

Thursday, November 20, 2014

Sweat shirts to rag rug


I don't know about you, but I frequently end up with stained clothing.  No matter how careful I may be while creating, I inevitably spill something on myself.  Just call me "grace".  Or klutz, whichever you prefer.

Not only am I accident prone, I am also easily chilled.  It's the native Floridian in me, I am sure. Needless to say, I spend quite a bit of time wearing cozy sweats when I am working in temperatures below 70 degrees.  The cold and I are not friends.  Consequently, I have stained quite a few of my warm and fuzzies by wearing them while crafting and creating.  Hence the abundance of sweat shirt fabric just laying around my house, waiting for a new lease on life.

This rug was crocheted using three different colors of sweats.  The center circle is a pale blue, stained ever so nicely with paint.  The blue is followed by a lovely yellow and finally the plain jane sweat shirt gray.  The stains are still visible throughout the rug.  However, I learned while crocheting this project that the stains became part of the pattern.  Since sweats are fluffy on the inside and smooth on the outside, crocheting twists the fabric in such a way that a nifty pattern emerges.  Using the old sweats was fun.  The rug is super soft and kept me cozy while I crocheted.  And I was able to reuse fabric that could have just as easily ended up at the landfill.  There I go being Earth friendly again.  :)


Tuesday, November 18, 2014

Paper towel tube napkin ring


 I am not ready for Christmas yet!!!  However, every single store around me has been promoting the holiday for a month!  Shucks, at this rate, I would not be surprised if retailers start promoting the big spending season beginning the Fourth of July.  I am already stressed out by the mere thought of Christmas simply because I have been inundated with the sights and sounds of retailers since early October. So, on that note, I have decided to focus on Thanksgiving.  Just call me a rebel.

Considering I have plenty of supplies and materials on hand, I have been busily crafting Fall and Thanksgiving themed pretties.  First on my list, napkin rings.

I began by gathering some scrap fabric and ribbon with what I consider a Fall color scheme.  Next, I cut paper towel tubes into 1 1/2" sections.  I applied Mod Podge to the tubes, wrapped the fabric around the tube and let it dry.  Once dried, I applied more Mod Podge to the inside of the ring, clipped the overlapping fabric down inside the ring (tube) and let dry again.
I decided that I did not like the look of the inside of the ring as it was (and yes, I am picky like that) so I added a thin strip of coordinating fabric inside the ring, followed by a final layer of Mod Podge.

For anyone who has never had the pleasure of working with Mod Podge, you just don't know what you are missing!  This stuff is GREAT!  It is easy to apply, dries quickly, and converts fabric and cardboard into something sturdy.  It's a wonderful thing!
My little scrap fabric, ribbon and cardboard napkin rings are now hard as a rock and ready for the table.

Tuesday, November 11, 2014

T-shirts to rag rug


Not long ago, I was given a car load of fabric.  Okay, maybe not a "car load", but more so a "back seat" load of fabric.  Either way, there were many big black trash bags filled with goodies.  Among those gems were about 30 t-shirts in varying sizes but identical in color; forest green with white print. The white print was on both the front and back of the shirts making it difficult to decide how to re-purpose them.  However, I am always up for a challenge!

I began the creative process by removing the neckbands and sleeves from each shirt.

I then cut each shirt in strips, from top to bottom and sewed each strip together.  The end result of this process was one extremely long chain of knit "yarn", so to speak.
It was time to bring out my monster sized crochet hook and get busy.  Thankfully, my son loves the color green!  Both his bathroom and bedroom are decorated with various shades of green, so I knew I could put a new rug or two to good use.  
There are several nice things about working with t-shirt "yarn". Projects go together quickly and the materials are easily transported.  I was able to produce this rug in a few hours because I kept the crochet stitches simple and took it with me each time my son had an activity away from home.  We may be a homeschooling family but we spend a lot of time away from home either for extracurricular activities or classes. 

Having completed the project, I realized I learned several things.  First, I realized that a crocheted rug will look better if I work on a flat surface.  Secondly, I realized that I needed to expand the rug as I went along so I simply added an extra stitch or two at each end of the oval to allow the rug to lie flat. Finally, a t-shirt rug is quite a bit heavier than a cotton or fleece rug.  The added weight, combined with the bits of screen printing, provide a more stable surface for a bathroom rug.  This rug does not go sliding across the floor like a fleece rug.  A sliding rug can be a recipe for disaster, especially so when placed near a bathtub.

When all was said and done, this rug used approximately 10 shirts that would have otherwise ended up in the local landfill.  It is Eco friendly, cute and functional.  What more could a girl ask for?  ;)


Tuesday, August 19, 2014

Revamped envelopes = party favor utensil holders


I happen to have a lot of greeting card envelopes just lying around, gathering dust.  I also had a need to organize utensils for my boy's birthday bash dinner.  The theme for his party was mock paintball which gave me license to incorporate a variety of colors.  As I like to do things a little differently than most, I decided to use my stash of envelopes as utensil and party favor holders.


My man helped me out on this one.  While I was wrapping the plastic utensils in paper napkins, he was busy sealing and snipping the envelopes.  This was one of those times where I was glad I had a pair of pinking shears available.  They make nifty designs in paper.  Once the envelopes were cut and filled with utensils, I taped a noisemaker to the front.  I then added in a few Pixie Stix and a bendy straw and the project was complete.  

Oddly enough, the adults at the party had as much fun with the candy and noisemakers as did the teens. Go figure.

Monday, August 4, 2014

Chest of drawers upcycle

One of today's projects in the works; a chest of drawers upcycle.  As I said, it is in the works so the pictures do not depict a completed project.

My man brought this home for me a few weeks ago and I have been itching to get started!  It came to me as a Plain Jane 5 drawer chest of drawers in need of attention. Two drawers need new bottoms while the other three have already been replaced.


There was nothing wrong with this baby that couldn't be repaired; she's just a little plain looking.  Thus far, I have tried a purple paint job but did not care for that.  Next, I considered working a card stock mosaic across the top, down the sides and over the drawer fronts.  However, that would be somewhat time consuming and I am on a time budget for the next two weeks.  My boy's birthday party rapidly approaches so I need to be careful about the projects I become involved with.  Nothing like inviting a houseful of guests to get me moving! 

This is the progress made thus far.  I have wiped down all surfaces and applied spray adhesive to the top, sides, drawer fronts and back support piece.  Next, I affixed two different patterns of paintable wallpaper we picked up last year on clearance at Lowes.  I believe each roll cost $2.00.  The next step will be to install another support bracket and shelf.  I am not quite certain how I will use this baby once I complete her but am excited to see what happens next!


Saturday, July 19, 2014

Recycling plastic bags


I confess, I am cheap, cheap, cheap; there is no doubt about that!  If I can reuse an item, I will. Plastic bags, aluminum foil and wax paper are all items I reuse until they fall apart or feel greasy, whichever comes first.  Since I reuse these things, I must wash them between each use.  I am cheap but dislike funk on my food; it's just a thing with me.  Washing plastic bags is quick and easy.  Finding a place to put them while they dry is another matter altogether - until now.  Take note of the cheerful little "clothesline" I have above my kitchen sink.  It was made with the hems from three discarded t-shirts knotted together and hung between two upper cabinets.  Add a few clothespins and voila, problem solved.

Also shown in this picture is my sweet little kitchen valance.  I just love that thing!  My new valance began its journey as a drapery panel left curbside after a neighboring family moved.  It has a nice heavy weight with a pretty little pattern. I simply could not let this little gem end up at the landfill so I brought her home.  Once she was washed, it only took a few minutes with a pair of scissors and a serger sewing machine to create a brand new look over my kitchen window. There is even some fabric left over for my next brainstorm.