Showing posts with label no sew. Show all posts

Thursday, November 20, 2014

Sweat shirts to rag rug


I don't know about you, but I frequently end up with stained clothing.  No matter how careful I may be while creating, I inevitably spill something on myself.  Just call me "grace".  Or klutz, whichever you prefer.

Not only am I accident prone, I am also easily chilled.  It's the native Floridian in me, I am sure. Needless to say, I spend quite a bit of time wearing cozy sweats when I am working in temperatures below 70 degrees.  The cold and I are not friends.  Consequently, I have stained quite a few of my warm and fuzzies by wearing them while crafting and creating.  Hence the abundance of sweat shirt fabric just laying around my house, waiting for a new lease on life.

This rug was crocheted using three different colors of sweats.  The center circle is a pale blue, stained ever so nicely with paint.  The blue is followed by a lovely yellow and finally the plain jane sweat shirt gray.  The stains are still visible throughout the rug.  However, I learned while crocheting this project that the stains became part of the pattern.  Since sweats are fluffy on the inside and smooth on the outside, crocheting twists the fabric in such a way that a nifty pattern emerges.  Using the old sweats was fun.  The rug is super soft and kept me cozy while I crocheted.  And I was able to reuse fabric that could have just as easily ended up at the landfill.  There I go being Earth friendly again.  :)


Tuesday, November 18, 2014

Paper towel tube napkin ring


 I am not ready for Christmas yet!!!  However, every single store around me has been promoting the holiday for a month!  Shucks, at this rate, I would not be surprised if retailers start promoting the big spending season beginning the Fourth of July.  I am already stressed out by the mere thought of Christmas simply because I have been inundated with the sights and sounds of retailers since early October. So, on that note, I have decided to focus on Thanksgiving.  Just call me a rebel.

Considering I have plenty of supplies and materials on hand, I have been busily crafting Fall and Thanksgiving themed pretties.  First on my list, napkin rings.

I began by gathering some scrap fabric and ribbon with what I consider a Fall color scheme.  Next, I cut paper towel tubes into 1 1/2" sections.  I applied Mod Podge to the tubes, wrapped the fabric around the tube and let it dry.  Once dried, I applied more Mod Podge to the inside of the ring, clipped the overlapping fabric down inside the ring (tube) and let dry again.
I decided that I did not like the look of the inside of the ring as it was (and yes, I am picky like that) so I added a thin strip of coordinating fabric inside the ring, followed by a final layer of Mod Podge.

For anyone who has never had the pleasure of working with Mod Podge, you just don't know what you are missing!  This stuff is GREAT!  It is easy to apply, dries quickly, and converts fabric and cardboard into something sturdy.  It's a wonderful thing!
My little scrap fabric, ribbon and cardboard napkin rings are now hard as a rock and ready for the table.

Tuesday, November 11, 2014

T-shirts to rag rug


Not long ago, I was given a car load of fabric.  Okay, maybe not a "car load", but more so a "back seat" load of fabric.  Either way, there were many big black trash bags filled with goodies.  Among those gems were about 30 t-shirts in varying sizes but identical in color; forest green with white print. The white print was on both the front and back of the shirts making it difficult to decide how to re-purpose them.  However, I am always up for a challenge!

I began the creative process by removing the neckbands and sleeves from each shirt.

I then cut each shirt in strips, from top to bottom and sewed each strip together.  The end result of this process was one extremely long chain of knit "yarn", so to speak.
It was time to bring out my monster sized crochet hook and get busy.  Thankfully, my son loves the color green!  Both his bathroom and bedroom are decorated with various shades of green, so I knew I could put a new rug or two to good use.  
There are several nice things about working with t-shirt "yarn". Projects go together quickly and the materials are easily transported.  I was able to produce this rug in a few hours because I kept the crochet stitches simple and took it with me each time my son had an activity away from home.  We may be a homeschooling family but we spend a lot of time away from home either for extracurricular activities or classes. 

Having completed the project, I realized I learned several things.  First, I realized that a crocheted rug will look better if I work on a flat surface.  Secondly, I realized that I needed to expand the rug as I went along so I simply added an extra stitch or two at each end of the oval to allow the rug to lie flat. Finally, a t-shirt rug is quite a bit heavier than a cotton or fleece rug.  The added weight, combined with the bits of screen printing, provide a more stable surface for a bathroom rug.  This rug does not go sliding across the floor like a fleece rug.  A sliding rug can be a recipe for disaster, especially so when placed near a bathtub.

When all was said and done, this rug used approximately 10 shirts that would have otherwise ended up in the local landfill.  It is Eco friendly, cute and functional.  What more could a girl ask for?  ;)


Wednesday, August 20, 2014

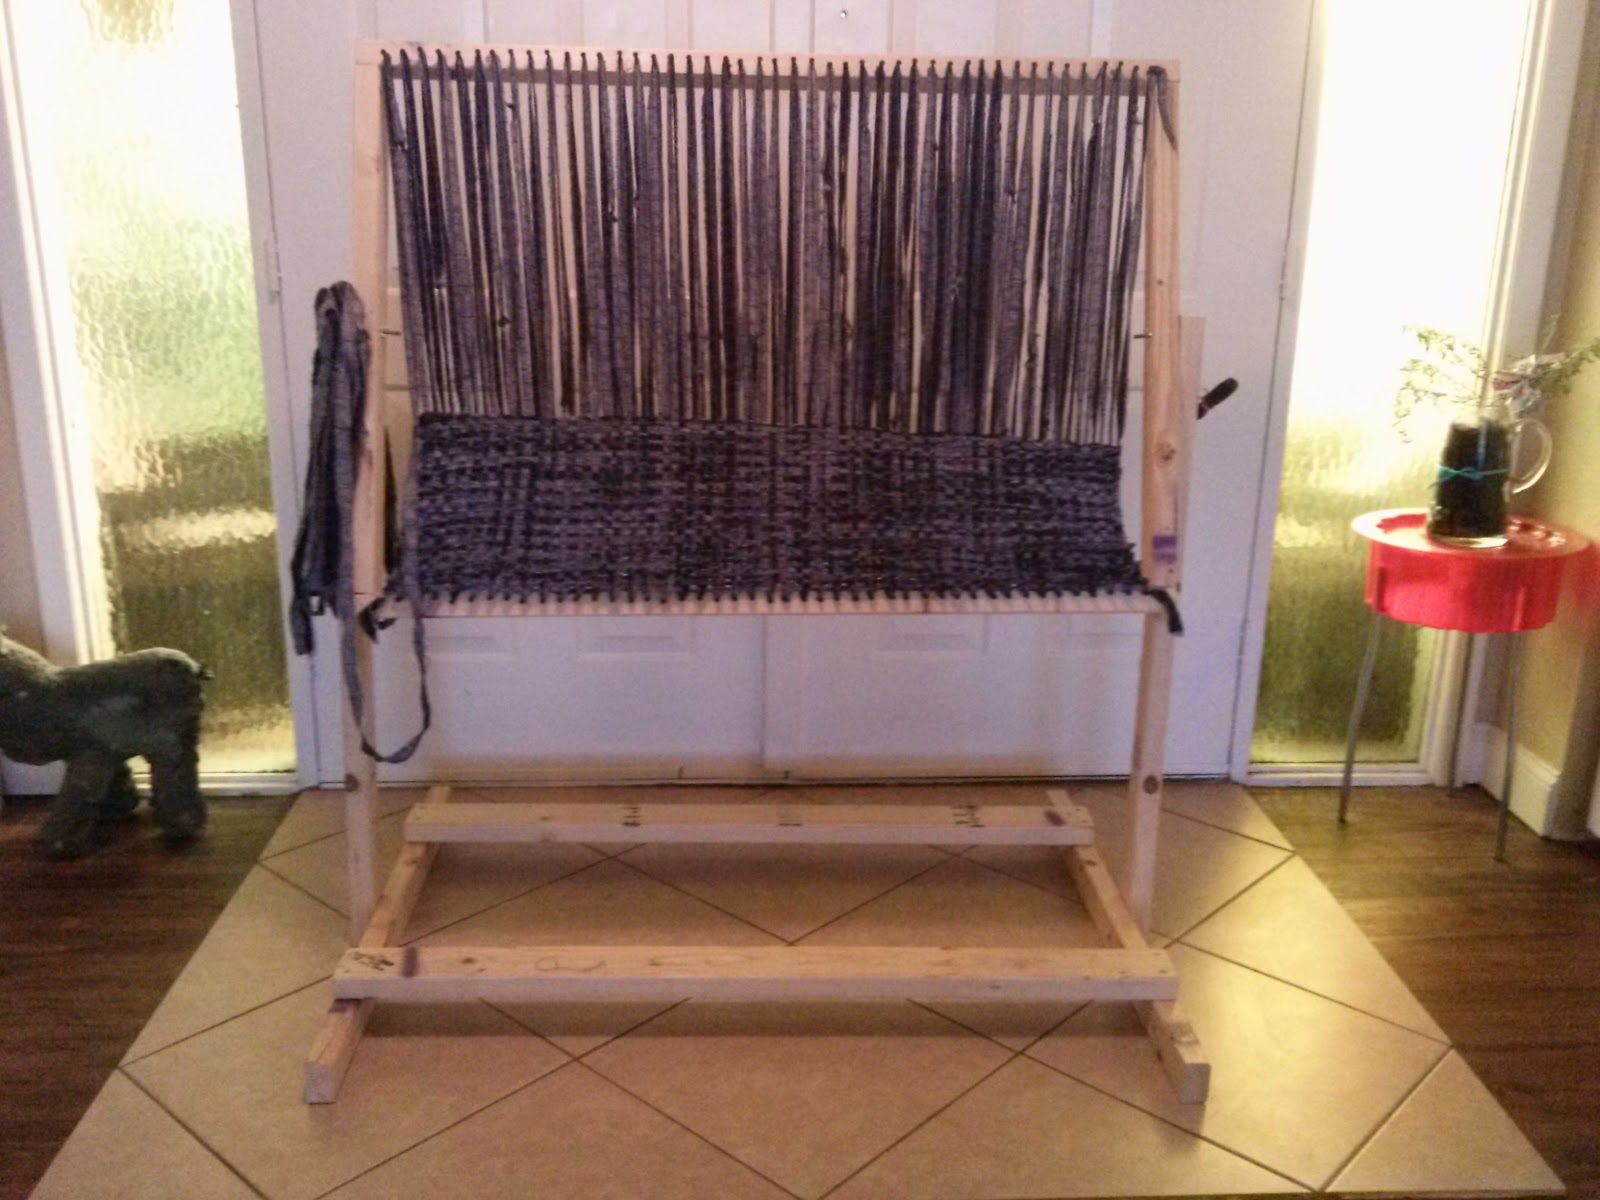
Rag Rug Frame Loom


We have several four-legged friends living with us.  Three cats, two dogs and two guinea pigs, to be exact.  As a general rule, I love having pets; except for the times they have "accidents" in the house.  One of our dogs is quite old and has apparently lost some bladder control, which I guess should be expected.  The other dog, however, is much younger but still has "accidents" regardless of the years we have tried to house-train her.  She is as sweet as can be but stubborn when it comes to potty training.  Needless to say, I am thankful we do not have carpeting in the house.  Heaven only knows what the house would smell like if we did.  

Although I am thankful for the lack of wall to wall carpeting, I do enjoy having scatter rugs throughout the house.  Unfortunately, our dogs enjoy them as well, either for napping or potty breaks.  Needless to say, I go through several rugs a week thanks to our furry friends. Originally, I thought I would buy several throw rugs and place them throughout the house.  That was, until I realized how much a throw rug could cost.  Considering I have a dozen rugs on the floor at any given time, purchasing these either new or used was cost prohibitive.  I had to learn how to make them if I had any hope of enjoying my little scatter rugs.


Thankfully, I love a challenge and got busy working on a plan.  I am also grateful for the fact that I come from a creative family and have been exposed to many different craft techniques through the years;  one of which is weaving.  

Although I did not wish to build a full weaving loom, I recognized that I could easily construct a simple frame to accomplish my rug making goal.  A few 2x4's and screws would fit the bill nicely.  Creating my own frame also allowed me to choose the size of the rugs I would be making.  

I began by making the loom portion; the area where I would create the rugs.  I cut (2) 2x4's 48" long and (2) 2x4's 30" long.  I screwed these together to make a rectangular form.  I then drilled screws  1" apart across the top and bottom portions of the frames.  These 1 5/8' screws are what I use to wrap my fabric around which is also referred to as the warp.

I did not like trying to weave a rug by sitting on the floor so I decided to make a frame to support my "loom".  Again, using 2x4's, I cut (2) pieces 40" long, (2) pieces 48" long and (2) 38".


My contraption is not the prettiest thing I have ever seen, but it gets the job done.  Weaving the rugs is very simple.  Once the vertical strips (warp) of fabric are wound around the screws, I simply weave the rug by running the horizontal strips (weft) in an over under fashion.  In other words, go over one strip and under the next.  Just like we did in elementary school.  Easy peasy!   I am now able to make rag rugs that measure 32" x 27" essentially for free, thanks to all of the fabric scraps my mom has given me.

Feel free to comment, offer suggestions or ask questions.  I love connecting with other creative people.

Tuesday, July 15, 2014

No sew scrap busting basket liner

Here's my little trash-to-treasure goody for the day; a basket I rescued from a future in the local landfill.  And yes, I have been known to root through a trash pile or two in my day.    The basket is a little bedraggled looking, I admit.  But with a little time and imagination can become something new and useful.  


I happen to have a LOT of scrap fabric and varied materials lying about.  That goes back to my trash treasure hunts and my mother's decision to start cleaning out her stockpiles of whatnots and goodies.
I began with a pretty piece of blue fabric and three bottom hems from t-shirts.
I cut and tied the tree t-shirt hems together and braided.

Then I tucked the fabric into the basket and wrapped the braided t-shirt hems around the top of my basket.  So far, so good!
The final step; trimming!  My little basket won't win any awards but it serves it's purpose well.  I now have a cute little basket to use for storing my crochet hooks, knitting needles and embroidery hoops.  
Ta-da!  All of my needle crafting goodies can hang out together in their new home.  Woot-woot!  Another item checked off the list in my never-ending quest to find a place for everything and have everything in its place.