Showing posts with label woodworking projects. Show all posts

Saturday, January 10, 2015

Handmade gift for woodworkers or crafters


My Dad is a lifelong woodworker.  I, however, am new to the game and view things a little differently.  Call me a neat nick or organizational nut, but I like keeping similar items together.  It just makes crafting and building so much easier (for me) when I know exactly where to find what I need.  I also prefer having the ability to easily assemble whatever I may be working on.  That must be the Mom in me.  Although my boy is now a teenager, there have been so many times when I had to stop mid project to attend to something happening in the house, I have become a bit of a nut with organizing my "stuff".

This little project is a result of my nuttiness.  I have glued together so many woodworking projects this past year, I became frustrated by always having to track down my glue, brush and rinse water jar. Those little devils just blend in to the workshop; they essentially disappear.   This irritates me.  So much so that I made a little glue workstation . . . and promptly gave it to my Dad for Christmas.

It's not fancy but I think it turned out rather well.  With four small pieces of scrap wood, a couple of hole saws, a brad air nailer and, of course, glue,  everything has a place.  I painted it red to make it easily visible in the workshop and added in a few leftover fruit cup bowls for those projects needing glue brushed on rather than squirted directly from the bottle.  I even added in an old plastic peanut butter jar (with a lid) and decorated it with striped duct tape.  This way, the rinse water can be covered when not in use to help prevent any spills.  I am notorious for knocking things over.   The duct tape also provides a little grip, so to speak, on a slippery plastic jar.  Well that and I think it is pretty.  Functional and cute, who doesn't love that?


Wednesday, August 20, 2014

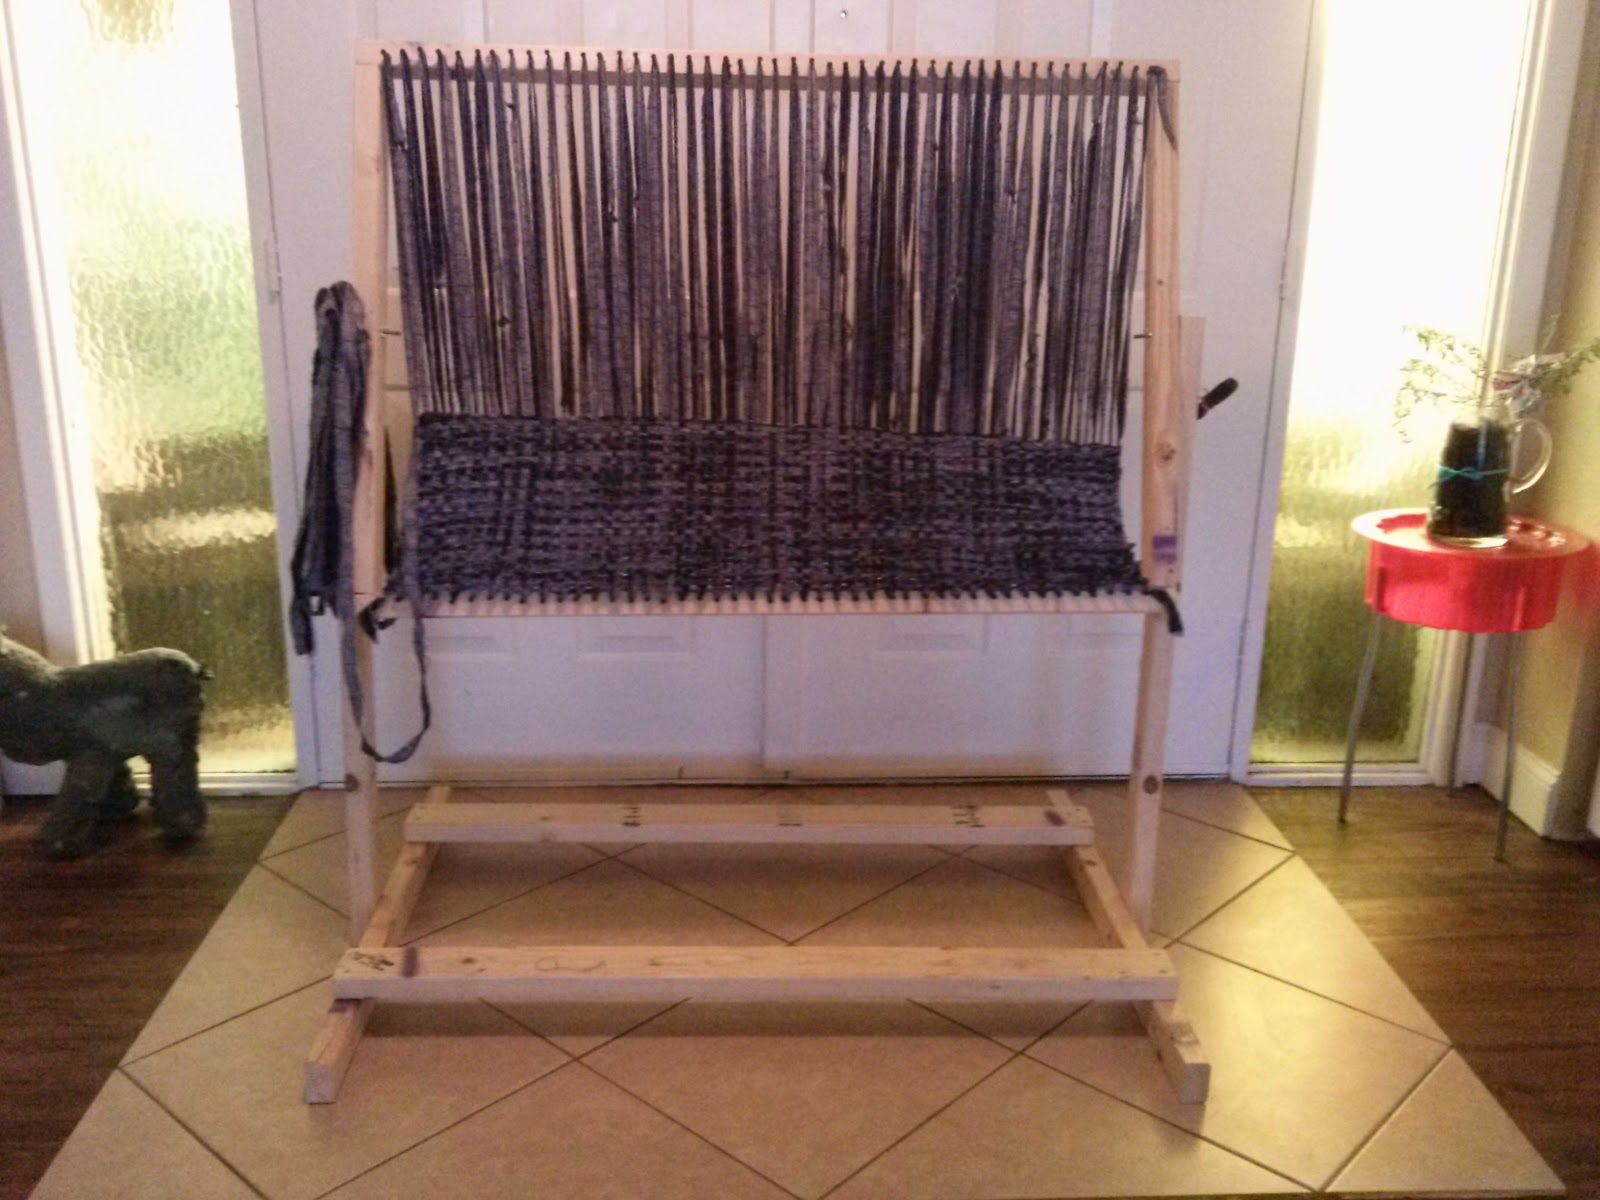
Rag Rug Frame Loom


We have several four-legged friends living with us.  Three cats, two dogs and two guinea pigs, to be exact.  As a general rule, I love having pets; except for the times they have "accidents" in the house.  One of our dogs is quite old and has apparently lost some bladder control, which I guess should be expected.  The other dog, however, is much younger but still has "accidents" regardless of the years we have tried to house-train her.  She is as sweet as can be but stubborn when it comes to potty training.  Needless to say, I am thankful we do not have carpeting in the house.  Heaven only knows what the house would smell like if we did.  

Although I am thankful for the lack of wall to wall carpeting, I do enjoy having scatter rugs throughout the house.  Unfortunately, our dogs enjoy them as well, either for napping or potty breaks.  Needless to say, I go through several rugs a week thanks to our furry friends. Originally, I thought I would buy several throw rugs and place them throughout the house.  That was, until I realized how much a throw rug could cost.  Considering I have a dozen rugs on the floor at any given time, purchasing these either new or used was cost prohibitive.  I had to learn how to make them if I had any hope of enjoying my little scatter rugs.


Thankfully, I love a challenge and got busy working on a plan.  I am also grateful for the fact that I come from a creative family and have been exposed to many different craft techniques through the years;  one of which is weaving.  

Although I did not wish to build a full weaving loom, I recognized that I could easily construct a simple frame to accomplish my rug making goal.  A few 2x4's and screws would fit the bill nicely.  Creating my own frame also allowed me to choose the size of the rugs I would be making.  

I began by making the loom portion; the area where I would create the rugs.  I cut (2) 2x4's 48" long and (2) 2x4's 30" long.  I screwed these together to make a rectangular form.  I then drilled screws  1" apart across the top and bottom portions of the frames.  These 1 5/8' screws are what I use to wrap my fabric around which is also referred to as the warp.

I did not like trying to weave a rug by sitting on the floor so I decided to make a frame to support my "loom".  Again, using 2x4's, I cut (2) pieces 40" long, (2) pieces 48" long and (2) 38".


My contraption is not the prettiest thing I have ever seen, but it gets the job done.  Weaving the rugs is very simple.  Once the vertical strips (warp) of fabric are wound around the screws, I simply weave the rug by running the horizontal strips (weft) in an over under fashion.  In other words, go over one strip and under the next.  Just like we did in elementary school.  Easy peasy!   I am now able to make rag rugs that measure 32" x 27" essentially for free, thanks to all of the fabric scraps my mom has given me.

Feel free to comment, offer suggestions or ask questions.  I love connecting with other creative people.

Monday, August 18, 2014

Pallets as decks


I have a tiny yard!  It is nice as far as minimizing the need to mow but difficult when it comes to landscaping. Or hosting a party.  We live in an area where the soil is mostly sand and the temperature is in the upper 80's to mid 90's the majority of the year.  Needless to say, my yard needs some creative solutions if I have any hope of having something cute or pretty or, at minimum, not bedraggled looking.  Here is an example of my poor little side yard.  It is approximately 5 feet wide and receives the full force of our beautiful Florida sunshine.
This is an example of the best it has looked in the 3 years I have lived in this house.  'Tis sad, but true. Admittedly, I have not spent a great deal of time in the back side yards primarily because they are usually really hot.  However, my boy wanted me to host his birthday party at home.  I was thrilled to oblige my 15 year old baby!  After all, when my teen thinks I can do something well, I start singing a happy tune!!   Once again, it was time for some thinking "outside of the box".

We decided that the birthday party would be a typical teen guy type of affair.  And I do have a reputation for hosting some ridiculously messy kid parties.  I didn't want to let my boy down but I needed some room to work my party magic.  ;)


The party theme was "mock paintball" where the teens would be separated into two teams.  Each team needed a home base to keep their paintball materials and various party game supplies.  I decided that decks would fulfill the needs of the party but did not have the money to buy the materials from the big box stores. Unfortunately, my go to source for building materials (Craigslist) did not have anything available.  However, my man was able to get some pallets and fence panels from his boss!  I was thrilled!!

I began by placing the pallets on some landscaping cloth I had saved from a failed gardening project.  

The pallets had seen better days and required some reinforcement.  I decided to add  2x4's down either side and fence panels slats in between the 2x4's.  The fence was originally 6 feet long which was far too wide for my needs.  I cut each panel in half and placed them perpendicular to the pallets.  I splurged and purchased some deck screws and secured the pieces together.

The project went together rather quickly and was a wonderful addition to the paintball party.  I even added a cute little bench, just for fun.  Best of all, my boy was happy which makes me happy.  Life is good!!


Friday, August 1, 2014

Scrap lumber stemware rack


This one has been on my wish list for quite some time!  I have wanted to add a little pizazz to my bland white and beige kitchen as well as find a convenient spot for my stemware.  Lo and behold, I could not find a stemware rack I liked, so I made one of my own.  

I began with some scrap lumber my man picked up at work, measured the underside of the cabinet, and went to town with the saw.  


Once the pieces were cut to length, I cut the end of each support piece with a 50 degree angle. The next step was to use the router to make slots for the base of the glasses to hang upside down.  After a little mishap with the router, namely letting my thumb get too close the the spinning bit, I drilled two pilot holes in each bracket with my handy dandy counter sink bit.  The final step, and most time consuming, was to spend my afternoon laying on the counter while I measured each type of glass base.  


Wouldn't you know, my eclectic assortment of stemware includes multiple diameters.

There are still a few little tweaks left to correct. One bracket is off by the tinniest bit so the glasses can only come out on one side.  After that,  I need to decide whether to paint, stain or simply seal the brackets.  Then again, I could just leave them as they are and move on to my next project. Time will tell.


Wednesday, July 30, 2014

Breakfast bar makeover


We have the strangest sized breakfast bar area I have ever seen.  It is tiny, shoved into a corner and is lacking any type of ventilation.  Needless to say, when I prepare a meal in the oven, this little area gets hot. The previous homeowners decided to convert the dining area into a small bedroom and left this tiny nook as a replacement.  As a dining location, it is absolutely useless for my family.  There may only be three of us at the table most meals, but this area simply was not large enough to accommodate us.  It was time for a change.


I could have purchased lumber and built some shelving but decided to go the quick and easy way; I bought inexpensive pine shelving racks from Kmart.  They were a snap to assemble and completely finished.  No sanding, staining, painting or measuring required.  


The base unit was quick and easy.  The counter top - not so much!  I checked into Formica counter tops at the big box stores but did not care for either the colors or prices available.  It was time to get into the workshop and create a counter top of my own design.  Considering the space was small, I thought the counter would be quick and easy to assemble.  I was sadly mistaken.

I combined 1x2's and 2x3's to make the top and apparently assembled the corner incorrectly.  I know this was the wrong way to go about a corner piece because I had to keep taking things apart and reassembling. This part of the project was one BIG lesson in patience!  Never having done this before, I quickly learned how tricky corners can be.  I cut the wood with 45 degree angles, glued the pieces together and then matched the corners.  What I should have done was glue the pieces together and then cut the angles prior to assembly.  Oh well, live and learn.

Ultimately, the project was completed, albeit imperfectly.  But that is okay with me.  I learned a lot while recreating this space and now have a handy place for dishes, flatware, glasses and small appliances.  All of which was taking up too much space in my small kitchen.

Saturday, July 19, 2014

Scrap wood over the range lighted shelf


I have been working on this little sweetie for two weeks!  Our over the range microwave bit the dust, again.  That was the second one to go in the past four years.  Obviously, this house is not meant to have an over the range microwave.  Either that or I am too cheap to hire another electrician to check the wiring again.

Once we removed the old microwave, I had one ugly looking area to start with.  It had potential even though I wasn't completely certain what to do with this new space.
When in doubt, build a box.  Below is a view of the scrap plywood used for the box.  It had some delightful warps but was otherwise quite sturdy.  I know because I had to stand on the silly thing to glue and screw it together.  Talk about a workout!  

The bare wood look was not for me, nor did I feel that a stain would blend well with the existing kitchen.  That left me with painting it to match the rest of the cabinets.  With free paint from the landfill, of course.  Notice how the paint really highlights the gap on the upper left side.  Ah, the joys of working with wood.  :)

I used some scrap lattice pieces to trim the edges.  


I decided to jazz up the interior with a broken glass mosaic, added a shelf and two LED light strips.  Total cost for this project = $25 for the lights.  I am one happy lady woodworker!! 

Tuesday, July 15, 2014

Scrap wood and metal pipe towel bars


Originally, my boy's restroom came equipped with a flimsy aluminum towel bar placed awkwardly in the middle of a very long wall.  It was inconvenient to reach either from the shower or the sink.  And, as I mentioned, it was flimsy so it came off the wall more than once.  All of these factors led to a need for the momma (me) to fix it.  

Thankfully, my Dad is a lifelong woodworker and has taught me a thing or two through the years.  :)  Out came the tools, the wood, and some creativity.  Truth be told, I did shop for a replacement towel bar or rack but found nothing I loved.  So I made my own.


The towel bar backs are made from oak wood which was routered around the edges and stained with a mixture of colors I had on hand.  The towel bars were created with plumbing pieces; floor flanges, elbows and threaded pipe.  Once completed, we affixed the wood pieces to the wall studs to ensure these little darlings don't fall off ever again.

My boy loves his masculine looking restroom and I love being able to create these things. Thanks Dad for the woodworking help and advice through the years!  


Monday, July 14, 2014

Rolling Kitchen Cart


Thanks to my Dad for helping with the construction and design of my swanky, rolling kitchen cart.  Not only am I able to store my potatoes and onions within easy reach, the top basket holds my kitchen towels.  I am feeling quite organized and thrifty after this project.  Aside from the tile and grout affixed to the top of the cart, and the three baskets from Dollar Tree, this project was made with free materials.