.jpg)
Friday, August 22, 2014

Wednesday, August 20, 2014
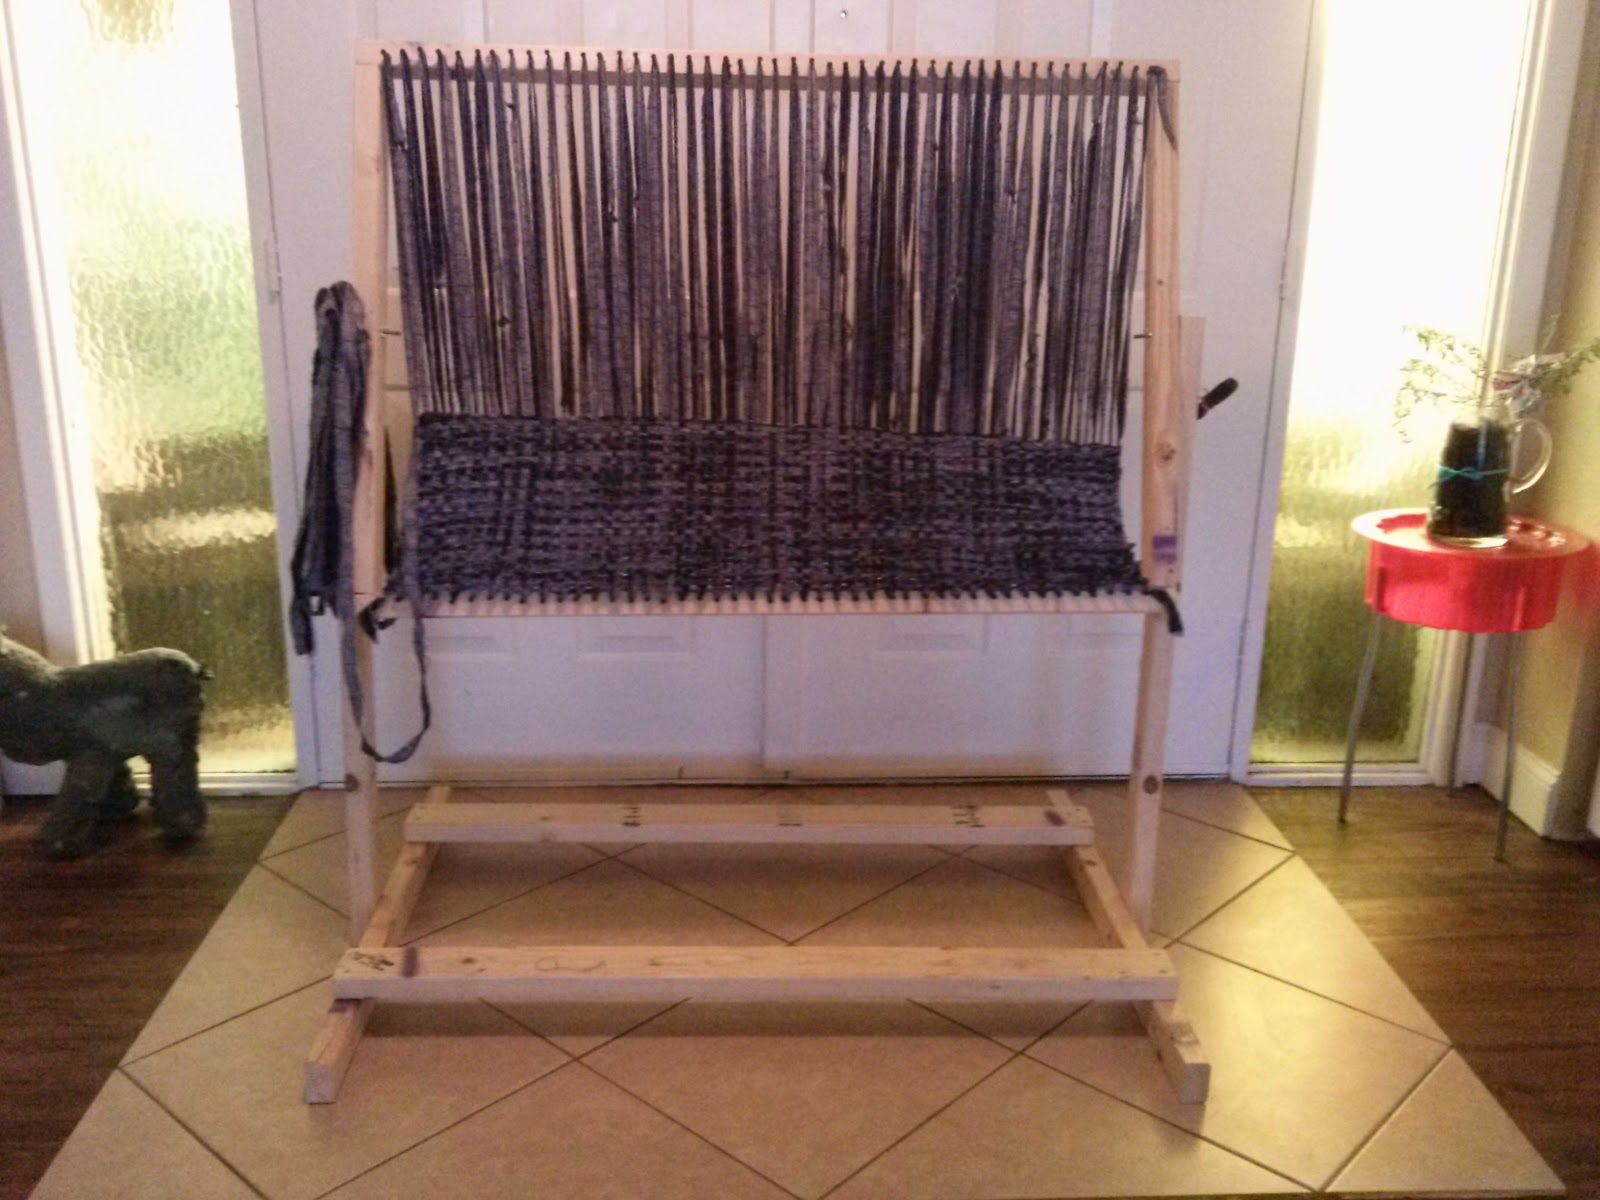
Rag Rug Frame Loom
 |
We have several four-legged friends living with us. Three cats, two dogs and two guinea pigs, to be exact. As a general rule, I love having pets; except for the times they have "accidents" in the house. One of our dogs is quite old and has apparently lost some bladder control, which I guess should be expected. The other dog, however, is much younger but still has "accidents" regardless of the years we have tried to house-train her. She is as sweet as can be but stubborn when it comes to potty training. Needless to say, I am thankful we do not have carpeting in the house. Heaven only knows what the house would smell like if we did.
Although I am thankful for the lack of wall to wall carpeting, I do enjoy having scatter rugs throughout the house. Unfortunately, our dogs enjoy them as well, either for napping or potty breaks. Needless to say, I go through several rugs a week thanks to our furry friends. Originally, I thought I would buy several throw rugs and place them throughout the house. That was, until I realized how much a throw rug could cost. Considering I have a dozen rugs on the floor at any given time, purchasing these either new or used was cost prohibitive. I had to learn how to make them if I had any hope of enjoying my little scatter rugs.
Thankfully, I love a challenge and got busy working on a plan. I am also grateful for the fact that I come from a creative family and have been exposed to many different craft techniques through the years; one of which is weaving.
Although I did not wish to build a full weaving loom, I recognized that I could easily construct a simple frame to accomplish my rug making goal. A few 2x4's and screws would fit the bill nicely. Creating my own frame also allowed me to choose the size of the rugs I would be making.
I began by making the loom portion; the area where I would create the rugs. I cut (2) 2x4's 48" long and (2) 2x4's 30" long. I screwed these together to make a rectangular form. I then drilled screws 1" apart across the top and bottom portions of the frames. These 1 5/8' screws are what I use to wrap my fabric around which is also referred to as the warp.
I did not like trying to weave a rug by sitting on the floor so I decided to make a frame to support my "loom". Again, using 2x4's, I cut (2) pieces 40" long, (2) pieces 48" long and (2) 38".

My contraption is not the prettiest thing I have ever seen, but it gets the job done. Weaving the rugs is very simple. Once the vertical strips (warp) of fabric are wound around the screws, I simply weave the rug by running the horizontal strips (weft) in an over under fashion. In other words, go over one strip and under the next. Just like we did in elementary school. Easy peasy! I am now able to make rag rugs that measure 32" x 27" essentially for free, thanks to all of the fabric scraps my mom has given me.
Feel free to comment, offer suggestions or ask questions. I love connecting with other creative people.

.jpg)
Tuesday, August 19, 2014
Revamped envelopes = party favor utensil holders

I happen to have a lot of greeting card envelopes just lying around, gathering dust. I also had a need to organize utensils for my boy's birthday bash dinner. The theme for his party was mock paintball which gave me license to incorporate a variety of colors. As I like to do things a little differently than most, I decided to use my stash of envelopes as utensil and party favor holders.

My man helped me out on this one. While I was wrapping the plastic utensils in paper napkins, he was busy sealing and snipping the envelopes. This was one of those times where I was glad I had a pair of pinking shears available. They make nifty designs in paper. Once the envelopes were cut and filled with utensils, I taped a noisemaker to the front. I then added in a few Pixie Stix and a bendy straw and the project was complete.
Oddly enough, the adults at the party had as much fun with the candy and noisemakers as did the teens. Go figure.
More scrap wood art/wall hangings
 |
| Finished Project measures 31 1/4" x 43" |
 |
| Mock brickwork paneling |
 |
| Painted brickwork paneling |
 |
| Leftover plywood pieces |
Once I decided to mix these elements together, I realized the frame would need to be cut to remove some damage from the corners. I learned that plastic stinks when you cut it with a saw. It is also difficult to align the angles. Obviously, I need help to learn how to cut mitered corners. Any tips would be appreciated.
 |
| Corner gaps after cutting off damaged pieces |
Since the corners did not align correctly, I had to cover the gaps with putty and paint. And, thanks to my boy's suggestion, I decided to paint the scrap plywood pieces black to match the frame. Once all was dry, I glued the "burst" to the center of the brickwork using wood glue. The final step was to add a little black glitter glue to the corners and burst pieces. After all, a girl likes her sparkles.
.jpg)
Monday, August 18, 2014


Subscribe to:
Posts (Atom)